
Making a Home for your Rats
Aquariums
Sometimes you can find aquariums for cheap that leak or have small cracks. A 20-gallon or larger aquarium will do for two rats. If the glass has a crack, run a bead of epoxy glue over it so no sharp edges are present. You will then need to make or buy a secure wire cover. You could buy a terrarium cover, but these are held on with latches and you, or anyone else opening the cage, must make sure to relatch it every time or your rats could push the cover off and get into mischief. You can also make a cover from 1/2 by 1/2-inch wire cloth found in most hardware stores. Cut out a piece about 4 to 6 inches larger than the top of the aquarium, cut 2 to 3 inch squares out of each corner leaving 1/2 inch bits of wire sticking out along the edge of one side. Fold the sides down over the aquarium and bend the short stubs of wire you left to secure the edges together. The idea is to make a cover that slips over the aquarium, but which will jam if pushed up from any one place. Your rats are not likely to coordinate their efforts by pushing simultaneously on opposite sides to remove the lid, yet you can easily remove it and won't have to remember to latch it. On the down side, we don't like aquariums because they are heavy, and difficult to dump out and clean. Also due to the poor ventilation, this type of cage will have to be cleaned more often.
If you do use an aquarium, consider making the sides of the cover much taller (12-24 inches) and adding a 1/2 by 1/2 inch wire floor recessed a couple of inches from the bottom so the whole thing sits on the aquarium as an upper story. Cut a hole in the floor and add a ramp to provide access. A door in the side would be nice too. This won't take up any more floor or table space and will add a lot extra running about space.
Wire Cages
Whether you buy or make your own cage, here are a few considerations to bear in mind:
Cage wire: The bottom of the cage should be a litter pan and not wire as walking on wire all the time leads to foot deformities. Any interior floors and the top of the cage (if rats will be playing on top) should be made of 1/2 by 1/2 inch vinyl, epoxy, or powdercoated wire to prevent feet from getting caught and broken. The sides may be made from 1/2 by 1-inch cage wire, although some believe only 1/2 by 1/2-inch wire should be used. We prefer the 1/2 by 1-inch wire for the sides because it is a heavier gauge wire. Shelves can be of 1/2 by 1/2-inch wire, though solid shelving is much preferred.
Litter pan: Avoid galvanized pans that have not been epoxy painted or powercoated. Urine can dissolve some of the zinc, which can get on feet and can be toxic when licked off. Lighter, cheaper, and easier to clean are plastic pans sold for under-bed storage with six-inch sides. The wire cage can be made to sit partially in the plastic pan without actually touching to bottom where liquids could corrode the wire.
Buying a Wire Cage
Locally, PetsMart in Tucson has cages suitable for rats for about $50 and up. Also check out the following online sources:
Exclusively Rats
Martin's Rat Cages
Super Pet Cages
Making a Wire Cage
There are several how-to web pages discussing rat cages:
Big Rat Cage
How to Make a Rat Cage
A Rat Cage
Camelot Rat Cage
To see some of our cages, click
here.
Making a Rat Garden
These are just semi-transparent Sterilite (or other brands) storage containers that you can buy for about $6 into which 3 inches or more of potting soil is added. Moisten the soil slightly so it is damp but not wet. Mix in some wild birdseed. This will give your rats something to dig in and something to dig for. Initially special treats, like sunflower seeds, can be mixed in to get them started in the joys of digging. In a few days some of the seeds will germinate and the rats can enjoy eating fresh sprouts. Add a hand-full of seeds every few days and mix them in. We cut a large hole in the lid and added a piece of acrylic (drilling holes every few inches and sewing it on with flexible copper wire), then ran a 3-inch PVC drainpipe from the cage to the garden (cutting holes in the sides of both) so the rats have access to the garden at all times. This gives them a bigger territory to explore and is a cheap addition that your rats will really like.
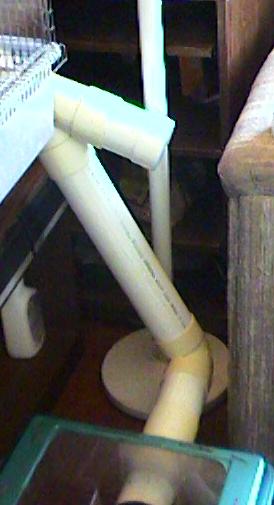
The rat garden above is on the floor. The 3-inch tube leads to the cage. Note the capped off section. We can remove the cap and add a long section of pipe going to a play area we put on a table in front of the couch. We do this while watching TV or anyother time we have for playing with the rats and sharing treats. To help them climb the steeper sections, a 1-inch strip of 1/2 by 1/2-inch wire left over from making the cage was added. Small holes were drilled and the ends of the wire strip inserted and bent over. If they were just allowed out of the cage, they would be able to get to and chew on speaker wires and electrical cords, so in this case we can't just open a door and put a ramp up for them to get to the play area. The use of tubes allows us to control ratty wanderings and keep them out of trouble.
Cage Accessories
Shelves:
As mentioned, shelves can be of 1/2 by 1/2-inch wire, but solid shelving is much preferred. We have tried covering wire shelves with the plastic canvas mesh used for needlework. This makes a nice surface that also drains, but we found that urine collects between it and the wire and is hard to clean without hosing off the whole cage or putting it in the shower. Solid shelves can be easily wiped off every day or so. There are a number of materials that could be used, but cheap and usable materials are hard to come by (see A Rat Cage listed above where two 3-inch plastic channels are used to create shelves--nice but each channel costs almost $2/foot or $4/foot of shelf!). Our best solution so far is to buy 10-foot sections of 4-inch drainpipe and cut them in half to create semi-circular shelves for about 30 cents/foot. These are snug places to sleep and are easy to clean. Wire hooks, a couple of inches long, are added to each end and these PVC shelves (which are cut to the width of the cage) can be hung horizontally or several can be hung at angles to provide ramps leading to the top of the cage. Shelves should be removable both for cleaning and to allow rearranging the interior to create variety.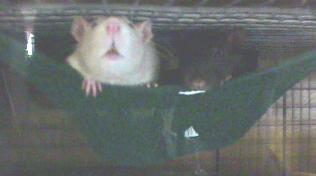
Hammocks: These are cheap wash or utility cloths often sold in packages of 8-12. A hook or safety pin is used in each corner to hang the cloth from the top of the cage. We hang them on and stretch them somewhat tight. The rats will pull a side down and climb in. The cloth will then sag 3-4 inches under the weight of all the rats that will pile in (however many you have). Rats LOVE to sleep in these, and they add a lot of extra space to the cage. You will need several, however, as they should be changed and washed every few days. You can also fold a cloth almost in half, then sew up the sides to create a pocket, and hang it from the sides of the cage. You could also cut off the legs of old pants and hang them horizontally or vertically.
Running Wheels: These need to be at least 11 inches in diameter for females and 12 inches for males. These are nice to have but not essential. Don't use wire wheels as these can cause injuries. There are some really nice but expensive wheels available (spun aluminum with precision bearings for $70 or so). But we have found some pretty nice wheels at a reasonable price called
Wodent Wheels. We bought several extra, so if you're a local fancier and want one, we have some spares for less than you could order one.Other Stuff: Braid rope or strips of cloth and hang from the top to provide more things to climb on, or hang across the cage straight or at an angle. And don't forget branches. Cut 2-3 inch diameter branches to fit from side to side, straight or at an angle, and secure with washers and screws in each end.