Making Boxes for your Rock and Mineral Collection
Show off your collection with these deluxe display boxes
A Rock Box template (right click on this link, then Save Target As to a folder of your choice) can be used to make attractive boxes with room for labels for a thumbnail sized collection of rocks and minerals. The boxes are 1.5 x 1.25 inches, and are 1.6 inches high in the back. The boxes are easy to pick up, and labels can include a lot information about the rock or mineral.
We used MS Paint, which comes with all versions of Windows, to print the labels (look under Programs, then Accessories ). Before printing from Paint, go to File, then Page Setup, and change left, right, and bottom margins to 0.5, and the top margin to 0.4. Our printer happens to print at 120 dpi, so if it turns out that the printout doesn't fill the page or prints on several pages, the size of the graphic will have to be resized. If your printer prints 72 dpi (72 dots per inch) then resize the file from 120 to 72 (72/120= 0.6 so reduce the graphic to 60% of its original size). If your printer prints at 92 dpi, then reduce the size of the graphic to 80%. Using Paint, go to Image menu, then Attributes and change both "100" values to "80" or "60" to resize to 80% or 60% as needed. Other programs may be able to do this easier or do it differently.
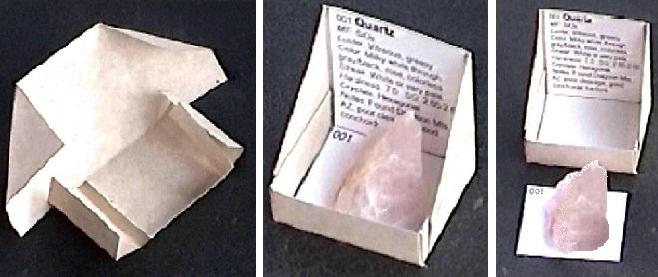
Print the template on 65 pound "cover stock" paper available from any office supply store (copy shops would also have it and often sell it by the sheet--20 sheets will make 120 boxes). This is easier to fold than card stock (110 pound) paper, but is still sturdy. Cut exactly on all solid lines, and use the short lines as guides when folding (fold so these marks are on the outside of the box where you can see them). A glue stick can be used for the final gluing (get the ones colored purple but dry clear so you can easily see where you applied the glue). After cutting, pre-fold using the short lines as guides, then unfold and glue. First glue the upper sides and fold over the diagonals. Next put glue on the middle flap that folds over the side strips that are connected to the front of the box, fold over this strip and press firmly to glue. Finally put some glue just below the diagonal fold and glue the back flaps to the sides.
Printing Labels for your Rock and Mineral Collection
After boxes have been made, you can use the Mineral Label template (right click on this link, then Save Target As to a folder of your choice), a .doc file in Word format, for printing labels. Print on card or cover stock for added strength. The labels, once cut out, are folded twice on the lines and inserted into the box and glued.
Small specimens can be stuck on a card using poster putty to keep them centered in the box. A Small Specimen template (right click on this link, then Save Target As ), another Word file, prints out rectangles (use cover or card stock) of the right size for easy cutting. You could use cards for all your specimens and number the card instead of the specimen, which is what we decided to do. This allows each specimen to be positioned for best viewing. You can still remove the card with specimen from the box and even the specimen attached to the card for close viewing.
The general form of the label is as follows:
### Name
MF:
Luster:
Color:
Streak:
Hardiness:
SG:
Crystals:
Notes:
### Name
Your collection will probably number fewer than 1000 specimens, so number them 001, 002, 003, ....999. You should paint a white spot on each specimen and number it also with a fine tipped marking pen, or print numbered cards and stick the specimen to the card. The mineral's name, writ large, follows the number on the label.
MF
Molecular formulas tell you what atoms a mineral is composed of, and helps you see relationships between minerals that may have very different names.
Luster
Luster describes how light reflects from a mineral. To identify a mineral it is important to distinguish between metallic (or submetallic) luster and nonmetallic luster. All transparent or translucent minerals are nonmetallic. Luster can be described using the following terms: vitreous (glassy), greasy (oily), silky, waxy, dull, resinous, earthy, pearly, opalescent, adamantine, metallic, or submetallic.
Color
Color is due to how light is absorbed (you see the colors not absorbed), and can be a useful property for identifying a mineral, but it can be misleading (quartz, usually white, can be black).
Streak
The color of a mineral's powder is more uniform than its surface color, so the color of its streak is important in identifying a mineral. While a ceramic streak plate is nice to have, you can get by without one by crushing a small sample into powder (hit it with a hammer against a metal block or another hammer), then rubbing the powder on a piece of white paper.
Hardness
Hardness is another important property used to identify minerals. Hardness means resistance to scratching. In the field you will just need your fingernail (hardness 2.2), a pre-1982 copper penny (hardness 3.5), your geological hammer (hardness 5.1) or a pocketknife (hardness 5.2), and a piece of quartz (hardness 7.0). A piece of window glass (hardness 5.5) is also useful. An old penny is needed because new ones are copper plated zinc. When testing the hardness of a rock, use the rock to try to scratch the hammer, knife, or glass and not the other way around.
SG
Specific Gravity (SG) is a measure of a rock's or mineral's density compared to the density of water (1.0), so a rock with a SG of less than 1.0 would float on water (like pumice). To calculate SG yourself, weigh a sample in air, hang it from a thread, submerge in water, and weigh again. Subtract the weight in water from the weight in air, and then divide that number into the weight in air. To make your own mass balance scale from coat hangers, click here.
Crystals
"Crystals" is short for crystal system. Minerals fall into families of crystal types: cubic, hexagonal, trigonal, triclinic, monoclinic, tetragonal, orthorhombic, and amorphous (glass-like having no crystal form). If you can see crystals and can identify the crystal type, identifying the mineral will be easier.
Notes
Here you can mention where a specimen was found, when, or how it was acquired. You can say something about its cleavage if it has any (poor, fair, good, perfect, distinct or indistinct), or its fracture (conchoidal, fibrous, splintery, brittle, hackly, uneven/rough, flexible). You might note if it is translucent. You could also note if the specimen is a variety of another, such as chalcedony being a variety of quartz.
Rocks
For rocks, use the Rock Label template (right click on this link, then Save Target As ) in Word format. After number and name, you will just note the type of rock: igneous (pyroclastic), sedimentary (diagentic), metamorphic (migmatitic), fossil, meteorite, fulgurite, or pseudo-rock, and it's SG if you determine it. Hardness can also be estimated using fingernail, penny, knife, and quartz. You should also note what minerals the rock is composed of. You can also note where the specimen was found, what it may be used for, and such things as whether the grains interlock, or whether the rock is foliated, fragmental or layered.
Bigger Boxes
For larger specimens, print Big Rock boxes (right click on this link, then Save Target As ), which are two times larger by area, 3x1.25 inches, but of the same height. Cut, fold, and glue pretty much as above.
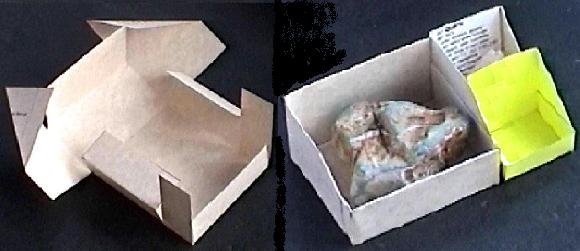
For bigger specimens print Bigger Rock boxes (right click on this link, then Save Target As ), which are four times larger by area, 3x2.5 inches, but of the same height can be made. Card stock makes for stiffer boxes, but cover stock works well. Cut, fold, and glue as above. Below is one such box.
For yet bigger specimens print Biggest Rock boxes (right click on this link, then Save Target As ), which are six times larger by area, 4.5x2.5 inches. Print in landscape mode and set top and bottom margins to 0.4 inches. Cut, fold, and glue as above.
For labels for these bigger boxes, use this Word file-- Big Box Labels (right click on this link, then Save Target As ), as a template.
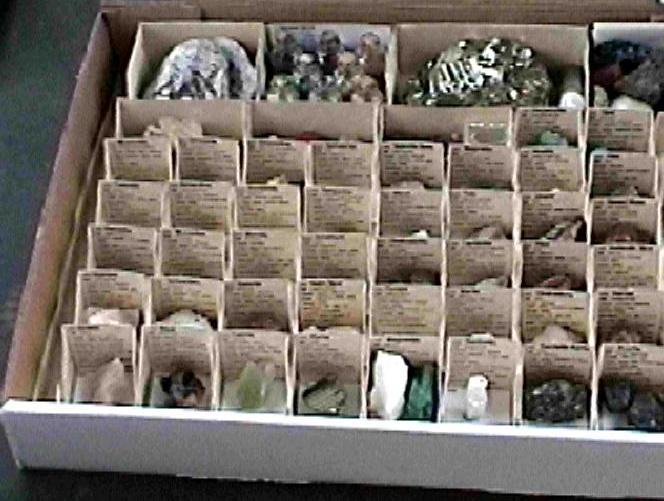
Since the bigger boxes are multiples of the small boxes in size, they will co-exist nicely in the same case. We found some cardboard boxes, white, about 15x12 inches and 2 inches high at an office supply store (Staples). With some minor alterations, these can be used to store your collection, at least until you can make a glass case for them.
![]()
- Visit our Zazzle store:
Support this site: Visit our Zazzle store featuring ultra hi-res images of artworks, Hubble/ESA/NASA space images, Mandelbrot fractals, maps and more. Images up to 525 megapixels allow for fine printing at the largest sizes. Consider giving a fine print as a gift that could hang on someone's wall for a hundred years or more.
Other sites by Alysion
- World's Funniest Jokes
- Survival Retreat? Maybe now is the time
- For wisdom: follow The Path of the Dog
- Beginnings: First Lines from Scriptures
- World Religion Simplified
- The Diamond Sutra: Condensed version
- The Platform Sutra of Huineng: Condensed
- The Tibetan Book of the Great Liberation
- The Zen Teachings of Huang Po on the One Mind
- Zen and the Art of Mindful Bus Riding
- Private Retreat: Alysion Acres
- Two Zen Stories
- 14 Mindfulness Trainings of Thich Nhat Hanh
- 14 Thoughtfulness Trainings
- Westfulness and Eastfulness
- Mindfulness Meditation Bell, Gong, Timer
- Buyer's Guide to Food Preparedness Products
- One Homestead: An intentional community
- Poems to Memorize & Memorable Poems
- Mom's Favorite Poems
- Ryan's Favorite Poems
- WWW Collection of Favorite String Figures
- Take the Super Post-Mensa IQ Test
- Handywrite
- Making the Tree of Life: Fun with phylogenetics
- Human Chow: The Website
- Fun with Dimensional Analysis
- Medication Math for the Nursing Student
- Walled-in: A poem
- Making Boxes for your Rock & Mineral Collection
- Making a Mass Balance Scale
- Ryan's 50 States Flashcards
- Adventures of MeraLee
- World Religions Simplified
- eBike Touring Association
- Small Animal Euthanasia at Home
- The True Right to Life Movement
- Cochise Stronghold Trail